Latest Articles and Blog Posts

How To Pick Out A Chef's Knife That's Right For You
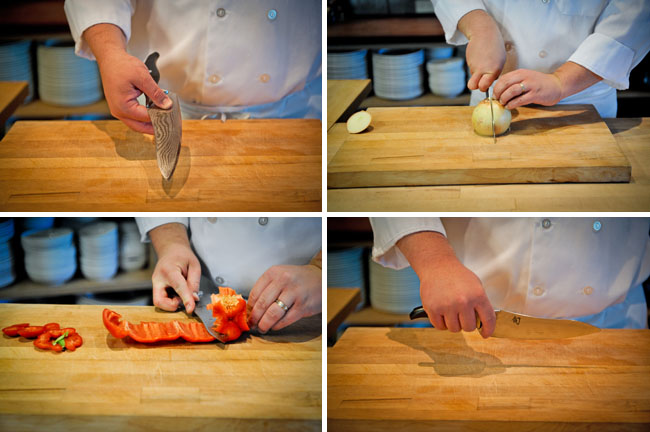

Choosing the right chef's knife is one of the most important decisions you’ll make when equipping your kitchen. Your chef’s knife is the number one tool you’ll constantly and consistently use. My advise is not to skimp and try and get off cheap.

You really don’t need any number of those crazy tools and gadgets that you see displayed at your local kitchen store. Avocado slicers, tomato dicer; what’s this, a lettuce knife? Please!

I like having gizmo’s and gadgets just as much as the next guy, but when it comes down to it, you only need two knives: a 10” chef’s knife and a 6-7” utility knife.

Why Only Two Knives?

When I first enrolled in culinary school, I was ecstatic to find $2,500 of my $55,000 dollar tuition would be put towards an extensive tool kit, including about 15 different knives. A couple months later when I begged my way into one of the best fine dining restaurants in San Francisco as an apprentice, I realized I really only needed two knives; a 10” chef’s knife and a 6” utility knife.

The first day I showed up, I brought my entire knife roll with me into their extremely small kitchen. After all, I didn’t know any better, I was nothing more than some amateur who’d been watching Emeril bam all over the screen and make all sorts of money and I thought to myself, “I can do this.” So I ask the poor shlup who was assigned to baby-sit me where I could put my knives.

“You don’t. Put your knife roll upstairs with the lockers, and bring down your chef’s knife and your pairing knife,” he said with understandable annoyance.

This is how I found out the hard way, and with much embarrassment, you really only need two knives in your kitchen, a Chef’s knife (preferably 10”) and a pairing knife. As I progressed forward with my skills but still understood the importance of minimizing my knife selection, I traded in my pairing knife for a 6.5” Utility knife. Here’s why:

My 10” chef’s knife is my go to blade when I need to slice, dice, mince, julienne or batonnet, but it becomes a little arduous when fabricating meat or performing more delicate cuts. Although at first it may seem a little awkward using a utility knife in place of a pairing knife, with practice it can be done.

I also use my utility knife for all the major meat fabrication I do on a regular basis, including breaking down and de-boning chickens, fabricating beef tenderloins into filets, and cleaning and portioning fish. Quite honestly, with a little practice and proper technique, your chef’s knife and utility knife will be able to handle 95% or more of your average workload. But knowing the secret that you only really need two knives in your kitchen isn’t enough. To make this secret work, you need to know how to choose a knife that’s right for you.

What To Look For in A Knife

When I go out to buy a new knife, no matter if it’s a chef’s knife, utility knife, or just a knife for fun, these are the three main things that I take into consideration; steel, handle and weighting.

The Steel

The first thing you need to address is what kind of steel you want. This is commonly overlooked when buying a knife but it should play an important role in your decisions once you understand the two major differences.

Although there are many types of knives manufactured by different companies using numerous kinds of steel alloys, your decision will pretty much come down to two choices: German Steel or Japanese Steel.

German knives are characterized by traditionally having a little bit of a thicker blade as compared to Japanese knives. This makes them a little more sturdy and less prone to breaking off a tip when dropped (which can and will happen). German knives are also traditionally sharpened to about a 22° angle, making them sharp but also sturdy.
 

German Knife Pros:

  • Sturdy and strong.

  • Hold their edge for a good amount of time

  • Easy to sharpen

German Knife Cons:

  • Thicker blade makes delicate cuts more difficult, such as slicing sashimi for sushi, or the fine julienne and Brunoise of vegetables.

Japanese knives on the other hand have a more delicate composition with a thinner blade that is usually sharpened to an 18-16° angle. This extreme edge makes them impressively sharp, but they don’t stay sharp quite as long. They’re also a little bit more difficult to sharpen.

Japanese Pros:

  • Sharpened to an extreme angle which makes them razor sharp.

  • Great for more delicate cuts such as sushi and fine vegetable work.

Japanese Cons:
 

  • Tend to be a little more difficult to sharpen than German knives.

  • Because they are sharpened to such an extreme angle, their edge is a little more fragile and won’t hold for quite as long. (There are some exceptions to this rule).

The Handle

When choosing a knife, you want to take into careful consideration the type of handle the knife has. It should comfortably fit the type and size of your hand. If you have a smaller hand, you’re going to want to buy a knife with a thinner handle. Conversely, if you have a larger hand, you'll need to purchase a knife with a wider handle. Someone with a larger hand who uses a thin handled knife will develop pressure points in the palm of their hand. This will tense their grip, leading to poor fluidity of movement and inaccurate cuts.

The key to having good knife skills is a knife you can hold with a relaxed and comfortable grip for an extended period of time.

Weighting

Finally, the third and final aspect you need to take into consideration when purchasing a knife is the overall weighting. But remember, don’t confuse weighting with weight. Too often I hear people bragging about how nice and light their chef’s knife is. “Hey, check this knife out, it’s light as a feather!”

Who cares? It’s not like your curling a 50-pound dumb bell every time you pick up a chef’s knife! What really matters is how the weight is distributed throughout the knife, or the "balance."

For longer knives, such as the 10” chef’s knife or a long slicer, the balance point should be right where the blade connects to the handle, meaning the blade and the handle are of about equal weight. The shorter the blade gets (such as a three inch pairing knife), the more handle heavy the knife will be. This will give you greater control over the confined and intricate movements you will inherently be making with a shorter blade.

Chef Knives I Recommend

Further Information
 

Stella Culinary's Guide To Stock

What Is Stock?

A stock is a liquid made by slowly simmering ingredients in water to extract their flavor. The French word for stock is “fond,” meaning foundation, a true testament to just how important these flavored-liquids are to the cooking process. A great stock is one of the most important assets chefs and amateur cooks have at their disposals.

Ingredients Needed For Making Stock

There are four basic components to any great stock:

Bones – The key element (unless it is vegetarian), bones with a high collegian content (such as veal knuckle bones or chicken necks and wings) are best for making a traditional stock.

Mirepoix – Mirepoix, a mixture of onions, celery and carrots, is added to the stock for it’s aromatic qualities and to deepen the flavor of the stock. The basic ratio for classical mirepoix is:

  • 2 Parts Onion

  • 1 Part Celery

  • 1 Part Carrot

  • Note: For every five pounds of bones, you will need 1 pound of mirepoix.

Water – Seems pretty self-explanatory, but there are some things to consider. The water in which you simmer the rest of your ingredients will make up a large percentage of your stock. If you live in an area with hard water, or just poor water quality in general, I would recommend using bottled water. You don’t have to go crazy, the filtered water that is dispensed into plastic jugs at your local supermarket will work just fine.

Sachet – There are no hard and fast rules to creating sachets. A sachet basically refers to aromatic herbs and spices that are tied up in a cheesecloth pouch and simmered with soups, sauces, or stocks to add extra flavor. A basic sachet for a stock will usually include:

  • Bay Leaf

  • Sprigs of Fresh Thyme

  • Whole Black Peppercorns

  • Whole Cloves

  • Parsley Stems

  • Note: The amount of each ingredient you add to your stock is based on personal preference and how much stock you will be making.

Basic Recipe for Protein- Based Stocks

  • 5 pounds bones

  • 1 pound Mirepoix

  • 8 ounces tomato paste (If making veal stock)

  • Sachet: 5-10 Peppercorns, 5 sprigs thyme, 5 parsley stems, ½ bay leaf, 2 whole cloves

  • Water to cover

More Information

How To Cook Mashed Potatoes

Mashed potatoes are something that we all know and love. They make a great side dish to accompany your favorite meat entrée, and are so versatile that you can serve them with almost anything. Although most people understand the underlying principles of how to make mashed potatoes, there are some techniques and secrets that restaurant chefs employ to ensure that their mashed potatoes are better than the ones you make on “turkey day”.
 

Mashed Potato Procedure
 

  • Peel whole russet potatoes and cut into manageable chunks. I’ll usually cut my potatoes into quarters lengthwise, and then cross cut them into pieces roughly measuring about 2.5 inches.

  • Place your potato chunks in an appropriately sized pot, add a couple large pinches of salt and cover with cold water. Starting your potatoes in cold water will allow the complex starches to cook more evenly.

  • Place the pot on your stove top, turn to high heat, and bring to a boil.

  • Once the water begins to boil, reduce to a simmer and cook until fork- tender.

  • When the potatoes are fork-tender, strain them off and make sure that all the water is allowed to drain out.

  • From this point, most home cooks would simply mash with a hand masher, add butter, salt, pepper, and possibly a touch of cream. There is absolutely nothing wrong with this method, but if you want your mashed potatoes to truly be the best that your dinner guests have ever put into their mouths, then keep reading.

Secrets to Making Great Mashed Potatoes
 

So what are the secrets that restaurant chefs use to make great mashed potatoes? Here they are, in no particular order:
 

  • Use a food mill. Passing your mashed potatoes through a food mill will give them a wonderful silky smooth texture. Do this first, before you add your butter and cream. If you like your mashed potatoes chunky - fine, then don’t mill them. However, silky mashed potatoes are much harder to come by in the home, and honestly, they just taste better.

  • Add enough butter to give your cardiologist a heart attack. The number one reason why mashed potatoes made by a restaurant chef will always taste better than yours is because they mix in an enormous amount of butter. A good place to start is about 1-2 ounces of butter for every large russet potato used.

  • Use European-style butter. Most fine dining chefs use European-style butter because it has a higher fat content. One brand that is commercially available to the home cook is Land O’ Lakes. It should say something like “European Butter” on the box. (If you haven’t figured it out yet, fat is KING.)

  • The creaminess from your mashed potatoes should come from the melted butter, not the cream. Add your butter first until the mashed potatoes reach their desired consistency, and then add a touch of cream for added body and texture.

  • Some chefs believe that melting the cream and butter together before adding them to the mashed potatoes allows the fat to coat the starch granules of the potatoes more evenly, giving it a better texture.

  • Season your potatoes well with plenty of kosher salt. The number one mistake that most home cooks always make is that they under season their food. If you made your mashed potatoes properly, they should contain an enormous amount of fat, which will coat the palate. To counteract this, a little extra salt is needed to really bring out the flavor.

What are some of your favorite things to add to mashed potatoes, and what secret tricks do you use to make them the best your dinner guests have ever tasted?

How To Cook Risotto

Risotto is made with Italian-grown Arborio rice. Arborio has rice kernels that are shorter and fatter than other short-grained rice. The kernels contain a high amount of starch, which is what gives risotto its creamy texture. A common misconception is that cream is added to risotto to give it its creamy texture. Classic risotto, in fact, does not contain any cream. Although adding cream is not the worst of culinary sins, it should be added for richness and flavor, not texture. More on this later...

Risotto Technique

  • Start by sweating shallots in a pan with butter and a little salt, until the shallots are soft and tender. For every 1lb of Arborio rice, you will need to use 2-4oz of butter and sweat about 5 shallots.

  • Add the Arborio rice to the pan, stirring with a wooden spoon until the rice kernels are evenly coated with the butter; Do not brown.

  • Note: You don’t have to use butter for your fat. Any fat will do such as pork, duck, or olive oil - butter is just the classical choice. Take into consideration the flavor profile the fat you choose will impart on the finished risotto. As far as most chefs are concerned, butter is KING!

  • Once the rice is sautéed and coated evenly, add hot stock or water that is simmering in a separate pot, one ladle at a time.

  • Note: For every cup of Arborio rice, you will need at least 3 cups of hot stock or other liquid

  • Very gently simmer rice while constantly stirring.

  • Once the rice absorbs the first ladle of liquid, add more, one ladle at a time, stirring constantly. Repeat until the Arborio rice is soft but still “al dente”, and the starches have released from the kernel making the risotto nice and creamy.

  • Finish by stirring in butter and freshly grated parmesan.

If at all possible, use the correct corresponding stock of the protein you will be serving with the risotto. For example, if you will be serving it with fish, use a fish stock; if you will be serving your risotto with beef, use veal stock, etc. If the risotto is served as the entrée itself, use whatever liquid you feel is appropriate for your desired finished dish.

To Cream or Not To Cream

The debate among chefs on whether or not to finish their risotto with cream is a passionate one. Traditionally speaking, risotto is not finished with cream; instead, the creaminess is lovingly coaxed out of the starchy kernels of the Arborio rice. Here are some things you need to consider when making the decision “To Cream or Not To Cream.”

  • If you add cream for a creamy texture, I apologize, but you are sorely misguided. The creamy texture of your risotto should come from the Arborio rice itself. Remember, you are making risotto, not rice with alfredo sauce.

  • If you add cream for extra body and fat content (fat is always welcomed by the human palate), then you are adding it for the right reason.

  • Take into consideration that when you add fat to anything, it coats the palate, muting other flavors. The more subtle flavors of your risotto will be less detectable, so consider adding more salt or any other predominant seasoning or flavor you want to manifest in your risotto.

  • If you are serving the risotto with a more delicate protein, such as fish or poached poultry, I would leave the cream out. It may make the risotto too heavy, and as good as the risotto is by itself, your starch should never overpower your protein, it should always add to it.

  • When adding cream to a risotto, some chefs will whip it into a stiff whipped cream and then fold it in. This will not only give the risotto a rich flavor, but also a light and creamy texture.

Restaurant Risotto

Great risotto is a labor of love that can’t be rushed or faked. I’ve seen many different recipes for “quick and easy” risottos, some that even use a microwave (gasp!). Such culinary sins shall not be condoned on this site. However, did you think that the amazing black truffle risotto with wild forged mushrooms you had at Restaurant Fancy Pants the other night was made to order? Not likely.

 
With a cooking time of at least 25 minutes or more, restaurant chefs would never be able to make risotto “to order”. What follows is a basic restaurant technique for “pre-shifting” risotto. This will allow you to cook it ahead of time, and finish it “to order”.
 

  • Begin by starting your risotto with the basic technique stated at the top of this article.

  • Cook the Arborio rice until it starts to soften, but stop just before it becomes truly “al dente”.

  • Pour risotto out onto a buttered baking sheet and spread into a thin and even layer.

  • Cool in your refrigerator.

  • When you’re ready to finish your risotto, say, after your dinner guests have arrived and consumed a couple glasses of good wine, bring your cooking liquid of choice (stock, water, etc.) to a simmer in an appropriately sized sauté pan.

  • Add the par-cooked risotto into the simmering liquid, and use the back of a slotted spoon to break up the individual rice kernels by pressing them down into the pan.

  • Gently simmer and stir until the risotto is reconstituted and becomes “al dente”.

  • Finish with butter, fold in whipped cream (if you dare), season to taste, and add any other flavorings you wish, such as parmesan, truffle oil, etc.

  • Watch your friends marvel at how quickly you were able to make an amazing tasting risotto.

10 Tips For Surviving A Professional Kitchen

Walking into a new kitchen for the first time can be an extremely scary thing. Each professional kitchen has its own culture and way of doing things. If you take one misguided step, you risk embarrassing yourself - not to mention possibly ending up in the ER with a chef-inflicted knife wound.  To help you make a good first, and lasting impression, and to avoid costly doctor bills, here are my top ten tips for surviving a professional kitchen.

1) Always Stay Calm.

This is much easier said then done. Professional kitchens are extremely high stress environments and it takes discipline and nerves of steel not to freak out. When someone in my kitchen is nervous, it makes me nervous and it makes the chef really nervous. We can smell your fear like a pack of wild dogs tracking an injured animal. Even if you're freaking out on the inside, you need to project a calm exterior; this will show that you have confidence in yourself and your abilities. Also, it's not your job to start screaming at one of your fellow cooks or the wait staff. (Let the Sous Chef or Chef handle that one.) I know Mr. Wanna-Be-Tom-Cruise-Waiting-Tables-Until-He-Gets-His-Big-Break is a smug, arrogant prick. He wouldn't know good food if you force fed him a French Laundry tasting menu. Guess what, he's not your problem! So calm down and focus on the food before the chef kills you.

2) Move Deliberately And With Efficiency.

This point can not be over stressed. In a professional kitchen efficiency of movement is key. A dead giveaway that you're a "shoemaker" is when you start running around the kitchen like a damned chicken with its head cut off. Take a moment to collect your thoughts, gather your product for prep, and cut out any unnecessary movements. Here's a tip: anytime you have to pick something up or put it down, that's considered a step. Break your production into small steps to minimize movement and maximize speed and efficiency. I once had a sous chef that anytime he saw me working inefficiently, he would come up, put his arm around me and say, "Let me tell you the story of this guy named Henry Ford..."

3) Always Ask For Clarification.

If you're not clear on a task that has been assigned to you, ASK! Sure, if you make a habit of this, it will probably piss the chef off because it shows that you're not paying attention. However, the worst thing you can do is to be unsure about a task or technique and end up preparing the food wrong. Great kitchens are all about consistency. Trust me, you're much less likely to get smacked upside the head with a hot saute pan when asking for clarification than for screwing up the chef's food.

4) Don't Pretend You Know More Than You Do.

Don't BS people about your knowledge or experience. If anything, you need to under promise and over deliver. Professional cooks and chefs are an extremely egotistical bunch; there's a lot of pompous talk about talent and knowledge. Learn to walk-the-walk before you talk-the-talk.  Also, stop trying to impress people with French culinary terms. If they're applicable in the conversation, then use them. However, don't start throwing out some terminology to try and impress the chef. He'll be plenty impressed if you can learn the food and produce a consistent product.

5) Be Aware of Your Surroundings.

A kitchen is a crowded, hectic place. Let people know where you are at all times. Yell "corner" when walking around a corner. Say "Behind You" when walking behind someone. Say "Sharp" if you're walking by someone with a sharp knife and say "Hot" if you're walking around the kitchen with a hot pot. Not adhering to these rules is considered rude and dangerous, not to mention that it's a dead giveaway that you haven't spent much time in a professional kitchen. For a seasoned pro, these “call outs” are second nature. Chefs have been known to body check cooks into stoves when they try and walk behind them on the hotline without saying "Behind."

6) Do Your Homework.

Most restaurants have web pages complete with their menus. Read the menu and do research on any terms or dishes that you're not familiar with. Also, Google the restaurant name and the Executive Chef's name and read any article or web page to better understand what you're getting yourself into. This should be done before you even apply for the job. Make sure you're familiar with the restaurant, their food, and the chef's reputation before stepping foot into a new kitchen.

7) Shut Up And Stop Brown-Nosing!

When you first start in a new kitchen, try not to talk unless spoken to, or ask a direct question about the food or the current task at hand. Learn the cultural dynamics of the kitchen before you open your mouth and make a fool of yourself. The easiest way to alienate yourself on the first day of your new job is by being a “Chatty Cathy”.  And for God's sake, DON'T BROWN-NOSE! If you want to gain the chef's favor, keep your mouth shut, work hard, and follow the tips in this article. Trust me, the chef already knows how awesome he is, even if he really isn't.

8) Be Clean And Organized.

Always keep your station clean and organized, and be sure to put everything in its proper place before moving onto another task. Keep all your product organized around your work station, and try to keep your jacket and apron as clean as possible. You can usually identify the pecking order of any kitchen by how dirty the aprons and jackets are. The dirtier the jacket, the lower down the totem pole they usually are.

9) Limit Your Vices.

This may seem like a strange tip if you've never worked in a professional kitchen. The fact of the matter is, people who work in restaurants tend to be a hard- partying bunch. If you've spent anytime in the industry, chances are you've seen your fair share of extremely talented individuals self-destruct because of problems with alcohol and drug abuse. You'd be surprised how much of an advantage you'd have over other people in the industry if you're not constantly showing up to work hung over or drained from other forms of degenerate partying.

10) Have A Purpose.

Working in a professional kitchen requires so much time, effort, and energy that you will not last if you don't have a purpose for being there. Maybe it's to study under a great chef, or to see how the restaurant is managed. Whatever it is, make sure the restaurant you work at is moving you towards your culinary goals. You do have a goal, don't you? You better, because if you don't, you're doomed to be a miserable failure.

What Is Your Tip? Do you work in a professional kitchen. What tips do you have for surviving this crazy line of work? Click on the comment button below to let me know.

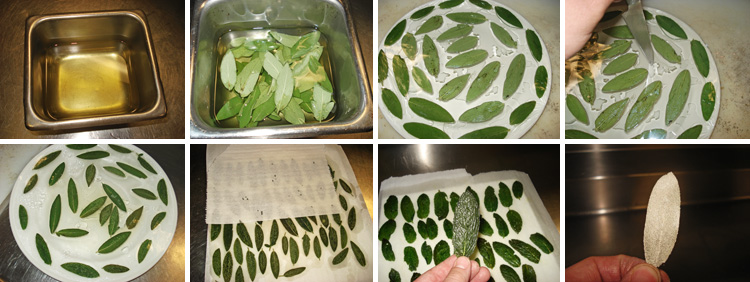
How To Fry Herb Leaves In The Microwave

Fried herb leaves are a garnish that has been around for ages. This technique, however, is lesser known than that of just throwing some herb leaves into hot oil. The problem with oil frying your leaves is that they will curl up, and usually turn brown. Using a microwave to fry your herb leaves for garnish will allow you to keep them nice and flat.
 

  • Start by picking the herb leaves that you want to fry and dipping them in canola oil. Here I'm using sage leaves, but mint and basil also work great.
  • Take an oven safe plate with a slightly raised rim and stretch a piece of plastic wrap over it so that it is nice and tight.
  • Take your herb leaves that were dipped in oil and spread them out on top of the plastic wrap.
  • Cover with another piece of plastic, wrapping it securely around the plate.
  • Poke a couple of holes in the plastic, and then microwave on high for about 3-4 minutes.
  • Carefully remove the plate from the microwave using a thick towel or an oven mitt. The plate will be extremely hot.
  • Once the plate has cooled enough to handle, carefully remove the top sheet of plastic wrap and lay the herb leaves between paper towels to dry.

The reason why this works is because of how microwaves interact with the water molecules in the herb leaves. The microwaves start knocking the water molecules around which in turn start pushing the oil molecules around. Since heat is nothing more than a measurement of molecular movement, the oil in which the herb leaves were dipped heats up and "fries" them.
 
A nice little touch is to brush the herb leaves with gold dust, especially if used for a dessert garnish.

Six Questions About Being A Professional Chef

A listener by the name of Stephen wrote me the other day with 6 questions about becoming a professional cook. Instead of writing him back directly, I figured the best way to answer his questions were in the form of a blog post so other readers could benefit as well. So here they are, 6 questions about becoming a professional cook.

What is the best part of the work?

For me, there are many things that I love about working in a professional kitchen, but if I had to choose only one, I would have to say pursuing food knowledge. I find food absolutely fascinating; how the slightest change in flavor, texture, and seasoning can be the difference between an OK dish and some of the best food ever. I also like the instant gratification you get when a customer absolutely loves your dish; I've never been a rock star, but when someone raves about my food, I sometimes feel like I am.
Also, your tasks in a professional kitchen are very structured and defined. You have set goals for prep, execution, plating, etc., on a daily basis. It gives your work an intense focus without abstractions; either you can get the job done properly or you can't. I've always found that working towards defined goals and achieving them is one of the best personal motivators in the world. In a kitchen, you get to do this on a daily basis.

What is the worst part of the work?

Although every profession has its own set of irritants, I hesitate to label anything the “worst” part of my job because there are things that I knowingly accepted as part of the struggle to achieve my culinary goals. I find that when people, especially in restaurants, label something as "the worst part of my day" or


"the worst part of my job" that they are instantly admitting defeat and letting that "worst thing" take over valuable time and effort, as well as their mental and physical energy.
 
Some things that will sometimes make my job more difficult are:
Spending nights and weekends away from my wife and child. Although she is extremely supportive, and she knew exactly what she was signing up for when we got married, I sometimes feel guilty that we can't have nights and weekends off together like most other married couples. However, when we do have time off together, it just makes it that much more special.
Not being able to spend Christmas and Thanksgiving with my family. I have a large extended family that I love deeply. The two days a year where almost everyone gets together are Christmas and Thanksgiving; because of the restaurant I have chosen to work for, I can no longer make these family gatherings.

How much money does a good cook expect to make?

It depends on where you work and who you work for. In the culinary industry, there is actually a reversal of salaries; the better the restaurant, the lower the pay. This is because truly passionate cooks are willing to sacrifice the lower pay to be able to put that great restaurant on their resume, and more importantly, take with them the techniques that restaurant offers to teach them. The industry average for line cook pay will range anywhere from just over $19,000 (on the low side) to $25,000 (on the high side). Hotels, union restaurants and corporate chain restaurants are known to pay more money and provide benefits, but don't expect them to teach you the newest and greatest techniques. Really, they just want you to show up and work your station. There is an old rallying cry among cooks in professional kitchens: "We came for the long hours, and stayed for the low pay." Being a cook isn't about money, it's about passion.

What would you tell someone who is wanting to become a cook?

If you’re just starting out, I have three keys to your success to being a line cook: (1) Passion, (2) Humility, and (3) Knowledge.
 
Passion. This is what is going to make all the sacrifice, low pay, and long hours worth it. You have to have a defined, passionate goal; something you want to work towards. And you need to have passion about food and someday being a professional chef. Without true passion, you will never succeed in a restaurant kitchen.
 
Humility. It doesn't matter how much you know about cooking or even being a line cook, you always have to be humble and be willing to learn new things. You can never be "too good" to clean floors, peel vegetables, and/or make stock. In fact, some of my fondest memories are when I first started out as a prep cook. They were simpler times with a world of possibilities at my feet. Enjoy it while it lasts.
 
Knowledge. If you want to be a professional cook/chef, you can never stop learning and you must have a burning desire to learn more about food and the inner workings of a restaurant kitchen. Read anything and everything you can get your hands on, and work for the best chef who will let you step foot in their kitchen, even if you have to start out by working for free. The sacrifice and investment in time will pay huge dividends in the long run.

What is better in your opinion, morning shifts working breakfast and lunch, lunch and dinner shifts, or dinner only restaurants?

This is a personal preference more than a "what is better." For me, I'm passionate about fine dining, so I prefer to work in a “dinner only” establishment because it allows me the time and focus I need to put out the best food possible. There is nothing wrong with being a breakfast or lunch cook, but each position requires different talents, passions, and goals. It's basically the difference between being a monster truck mechanic or a sports car mechanic; both have to have the same fundamental knowledge and skills, but their passion is what ultimately directs them in one direction or the other.

How do you decide in what type of restaurant you want to work?

For me, when I first started out, I decided that I wanted to work exclusively in fine dining because it opened up the most possibilities. It's really hard for someone who works at a mid-level bistro to make the jump to fine dining because most high level restaurants require years of experience before they even give you a call back on your resume. Starting out, I would recommend working for the best restaurant that you possibly can, and see where your passion leads you. It's much easier to go from fine dinning to rustic bistro than the other way around.

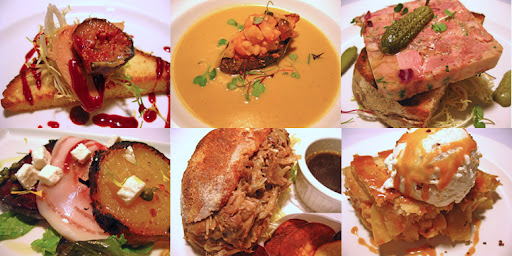
Fifty Fifty Beer Dinner At Stella

Last Friday we teamed up with Fifty Fifty Brewery to do a "Brew Master's Dinner." We had a lot of fun putting this menu together and Brew Master Todd Ashmen held the crowd captivated as he discussed each beer pairing.

Pages