Jan
08
2012
7
"Stella Studios"
By jacob burton
Hard at work creating new videos for your educational enjoyment!
Hard at work creating new videos for your educational enjoyment!
Wine dinners are always so much fun; an intimate environment where people can interact with the wine maker and share their passion for everything food and wine related. On Friday, June 17th, we hosted special guest, Ray Coursen, owner of Elyse Wines. While their home base is in Yountville, Ray sources grapes from different regions all over Northern California, including the Naggier Vineyard, which is located in the Sierra foothill’s town of Grass Valley.
When I visited Ray in Yountville and tasted through his wines, we discussed what kind of foods we craved with every new sip. With their complex finishes and sometimes unorthodox techniques, Ray's wines inspired a unique menu.
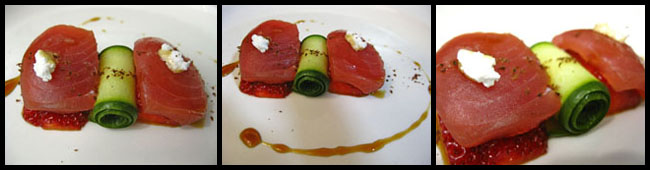
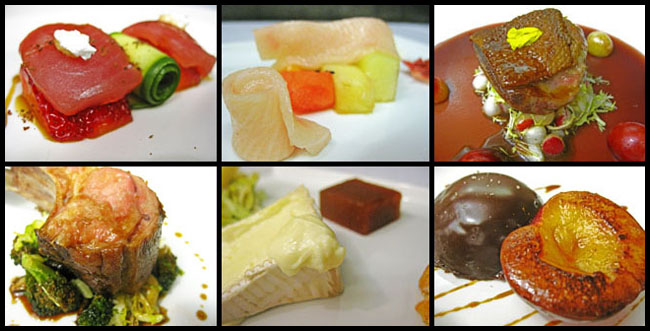
ahi-strawberry "nigiri"
Elyse 2010 Rosé
This course was originally supposed to be an amuse bouche of foie torchon with roasted apriums. Yet, as is my nature, I can't leave good enough alone and I've been retooling my torchon recipe using a couple different techniques. This time around, it didn't turn out how I wanted. Not to mention, because of our late start to Summer, apriums weren't yet available. But it all worked out for the best.
Ray generously donated a case of his 2010 Rosé. It has a beautiful, crisp mouth feel with a clean and refreshing flavor structure, especially when served chilled on a blistering summer day. There was a slight hint of strawberry and the tingling of the acid on my palate gave me the slightest perception of effervescent carbonation, even though there was none present in the wine.
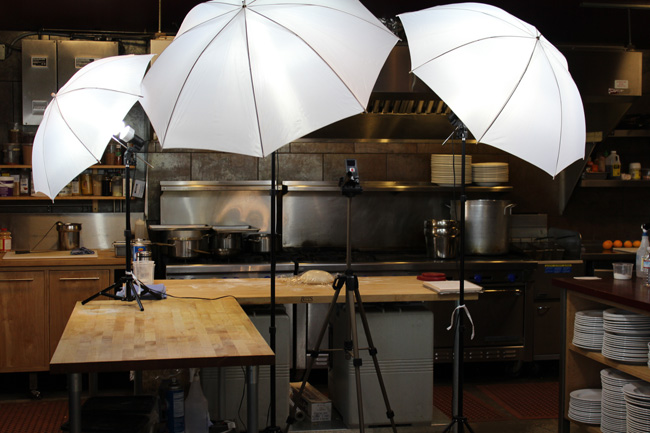
I had just received some beautiful A+1 ahi from my fish guru, Domi. As you can see in the picture, the ahi is a dark, rich red; not that flaccid pink color you see in a lot of low-end sushi cases. That pink color, by the way, is set by smoking lower grades of ahi with carbon monoxide.
We butchered the Ahi into "saku" and then cut nigiri-style slices. We then trimmed up some strawberry halves to make a platform for the ahi, much like a mound of rice. Since pickled ginger was a little too harsh for this presentation, (it would have blown away the delicacy of the Rosé), we opted instead to serve a slightly pickled strip of cucumber as a "palate cleanser."
The whole thing was sauced with a little bit of our home made citrus teriyaki and a slight sprinkling of sumac to enhance some of the slight citrus notes I picked up in the Rosé. It was garnished with a little piece of fizzy, which will fizz and sparkle in your mouth, a beautiful sensation when followed by a sip of Rosé.
Ahi and strawberries are always a great combination, especially when strawberries are at their peek. It was also Ray's favorite course of the night. At the end of the dinner he commented, "Everything was great, but the ahi with the strawberries just blew my mind!"
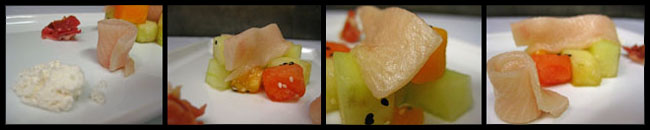
hamachi belly sashimi, prosciutto di parma, dehydrated roasted sesame oil, melon salad
2008 L'Ingénue, Naggier Vineyard
Oh hamachi belly, my arch nemesis for this menu. I've served hamachi belly many different ways, but when it came to this menu, I just kept over thinking it. I had about three iterations of this dish, including two failed components that I tried to experiment with the day before the wine dinner. In fact, I spent the Thursday before futilely testing a new concept that would ultimately end up in the trash.
The day of the wine dinner, I took a deep breath and realized I was forcing it. I was trying to make this hamachi dish something that it wasn't, and quite frankly, it was fighting back. Hamachi belly is such a beautiful, succulent piece of fish - my job was to leave it alone and let it do its thing...for the most part.
After the hamachi and I came to an understanding, it ended up being my favorite dish of the night.
The L'Ingénu is a complex white wine with an uncharacteristically long finish. I wanted to play off of some of these finishing notes; the slight smoke and citrus would go great with the prosciutto di parma. The fattiness of the hamachi and prosciutto would be cut nicely by the wine’s acidic bite. The melon salad was there to round out flavors and make a bridge between the hamachi and prosciutto.
The sesame oil is mixed with tapioca maltodextrin, an extremely light weight bulking agent. The cool thing is, when it hits your palate, the maltodextrin melts away, rehydrating the sesame oil back into its original form. This is especially convenient when pairing with a wine, allowing the guest to try different components together without the sesame oil running all over the plate, possibly taking over the dish.
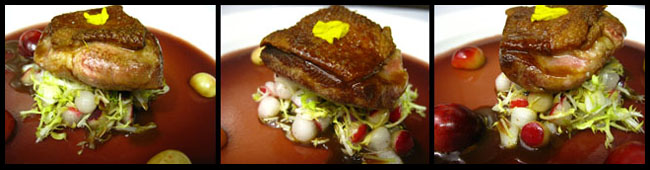
roasted duck breast, bing gelée, spring radish, seared rainiers, soy-duck glace
2006 Le Corbeau - Hudson Valley
In last month's newsletter, our featured seasonal ingredient was cherries. I wrote about a dish I did a few years back that consisted of a pan-roasted duck breast and a Bing cherry reduction sauce. It was simple, tasty, and an instant hit. While pairing duck and cherries isn't the most original idea ever, it's damn tasty.
When I first tasted the Le Corbeau, it screamed out for cherries. Mind you, it didn't taste like cherries; often when I pair food with wine, I'm looking for complimentary flavors, not foods that taste like the wine. Pairing a wine that taste like blackberries with an actual blackberry dish will often cause the two to cancel each other out. But if you pair with a contrasting yet complimentary flavor affinity, that can lead to an interesting and inspired dish.
Another thing that struck me about the Le Corbeau was its finish; it had a lingering spice. This is usually caused by "un-ripe tannins" that will completely dry out your mouth. But as I tasted the wine again and again, I realized that my mouth wasn't dry or being overwhelmed with tannins; yet this spicy note lingered on the finish.
"What is that spice on the finish," I asked Ray. "I know it's not tannin; I just can't place it."
"We coil up dried grape vines and pitch them in during the fermentation process."
"Is that a common practice?"
"No!" He chuckled. "No one else is that stupid."
And I'll be damned; it worked. It really worked. The spice was absolutely screaming out for duck, but it wasn't until a few weeks later that I was able to match that flavor with food. We were having a late Winter with almost no Spring in California which allowed us to buy some heirloom radish varieties that were much more mild then usual. Once the Summer sun starts to heat up, radishes become extremely spicy. Lacking the overbearing warmth of the sun, they still have a distinct radish spice, but it's much more subdued on the finish, allowing you to appreciate complexities in the radish that one simply cannot taste during the mid-summer months.
Wanting to control the amount of radish each guest received per bite, we parisienne balled a mixed case of radishes which yielded little spheres about the size of a large English pea. This was mixed with a frisée salad that paired nicely with the sweetness of the cherries, helping to tame the spice of both the radish and Le Corbeau.
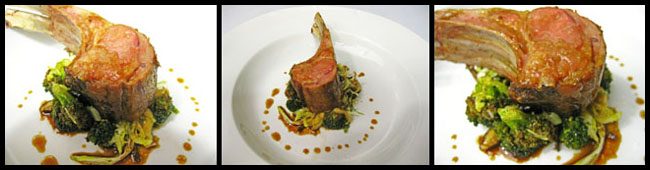
petite rack of lamb, roasted broccoli salad, honey-anchovy aioli
2007 Howell Mountain Zinfandel
Looking at this dish, it lacks the panache and presentation of the previous three courses. Yet sometimes simple is good. As a passionate young cook I often find that self-editing will reveal the best possible dish. When I took a sip of the Elyse Howell Mountain Zin, this lamb preparation was simply what I wanted to eat with this wine.
The rack of lamb was sous vide at 133°F/56°C for an hour and a half. After cooling the lamb, it was then seared to order and butter-basted to bring the core temperature back up, yielding a perfectly mid-rare piece of lamb with a beautiful roasted crust. It was served on top of a roasted mushroom and broccoli salad and dressed with a honey-anchovy aioli.
I know the aioli might sound a little weird, but think of it in the context of a Caesar dressing. In its emulsified state, Caesar is basically an aioli with parmesan, anchovy fillets and other ingredients incorporated. Now think of what happens when you take this same home made Caesar-on-steroids and add white boquerone anchovies and a 50 year aged sherry vinegar; only you add a little too much vinegar to really give it a tangy kick. That sour tang is then balanced with a dash of apple blossom honey to bring the dressing into focus.
Then imagine taking broccoli and wild mushrooms and frying them at 400°F, giving them a quick char, and dressing with this aioli. The dish is completed with a full reduction pan sauce, meaning that we don't use any starch thickeners. Instead, for this sauce in particular, we took about 5 gallons of veal and duck stock and reduced it down to about 2 quarts, reinforcing at each stage of reduction, straining multiple times, and finishing with a splash of Howell Mountain Zin and a few pats of butter.
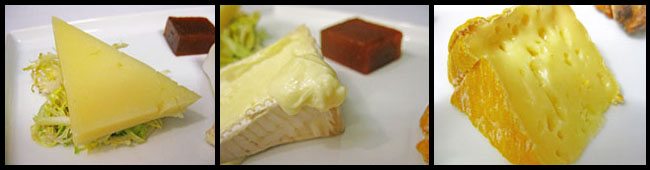
"cheese & wine" - pierre rober, abbaye de belloc, livarot coupe
2006 Cabernet Sauvignon, Morisoli Vineyard
Ahh, the Morisoli Cab. Ray produces a few different Cabernets, all from different vineyards. They way he puts it, "You're either a Morisoli Guy or a Tietjen Guy."
To make things even more interesting, the Tietjen Vineyard is directly across the street from Morisoli. What's more, Robert Parker and the Wine Enthusiast scored both wines an equal 90 points. I had to make up my own mind, which should be expected, but is none the less a daunting task when the wine maker is watching you taste from across the counter expecting you to choose a side; to decide "what kind of guy you are."
"I'm a Morisoli Guy," I finally concluded. "The Tietjen is great, but the Morisoli is what I want to pair food with and in my mind, that's what I always go back to. What wine do I want to 'cook for'.”?
"I'm a Morisoli Guy too," Ray admitted.
So what does this mean?
The Elyse Cabernet produced from the Tietjen Vineyard is what I would call an "instant gratification wine." If you want to drink a big, California Cab by itself, this is the wine to drink.
The Morisoli on the other hand makes you earn it. It's not instant gratification. Up front, it's subtle yet complex. The wine was so cohesive that it was hard for me to put my finger on any one flavor. But the finish; oh the finish! It went on for decades, complex and ever changing from second to second. A good food wine is all about the finish; the flavor structure that lingers on your palate, ready to enhance the next bite of food, at the same time, the food enhancing your next sip of wine.
Ray's pairing idea was brilliant. "With this, I think we should pair cheese."
"Absolutely!" I agreed. Wine and cheese are a time-tested pairing made in heaven. The problem was, finding cheeses that could not only stand up to this Cab, but enhance it.
I choose Pierre Robert, my favorite triple cream cheese, Abbaye de Belloc, a sheep’s milk cheese with a subtle pecorino tang without the salt, and Petit Livarot. Petit Livarot is a washed rind cheese with a distinct, "barn yard aroma" that is actually much milder on the palate then it is on the nose. Bite for bite, this was probably the best flavor pairing of the evening.
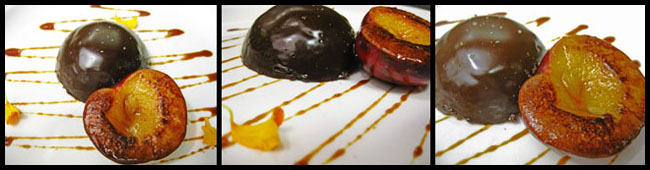
flourless chocolate cake, seared plums, cayenne, aged balsamic, smoked sea salt
2006 Cabernet Sauvignon Port
The Elyse port has an amazingly complex finish. While this port is definitely "sweet," it's not so overbearing that it kills your palate, making everything taste dull or sour in contrast.
It was Ray's idea to do a flourless chocolate cake which turned out to be serendipitous. One of the newest additions to the Stella team is Kevin, our executive pastry chef. This guy kills it on a daily basis. His techniques are incredibly solid only to be matched by his recipes.
I'm not a huge chocolate fan, usually too bold for my palate. Just a personal preference. And I'm especially not a fan of flourless chocolate cakes, which are usually dense, chewy pieces of formed chocolate. Yet Kevin has made me a convert. His flourless chocolate cake recipe is amazingly simple and will be posted in an upcoming article.
The chocolate cake was served with aged balsamic syrup and seared plum. The plum was sprinkled with a small pinch of cayenne to give depth and dimension to both the chocolate and the port. The cake itself was sprinkled with a little smoked sea salt; smoke always being a great flavor to pair with sweet.
Although prepping a salad is seemingly a simple culinary task, there are a few tips and tricks to keep in mind when selecting your greens and then later turning them into a delicious course.
When at all possible, try to use young, fresh greens. Young salad greens have a more tender and delicate flavor, where as older, “over-grown,” salad greens tend to be more fibrous, giving off a somewhat rubbery texture.
Slice your greens, don’t tear. There is a common misconception that for some reason tearing your salad greens is better than slicing them with a sharp knife. However, tearing salad leaves force you to grip them firmly, potentially crushing cell walls, which will ultimately cause bruising and wilting. Instead, use a sharp chefs knife to cut your leaves down to size if you feel they are too big.
Don’t wash lettuce leaves directly under running water. The pressurized water coming from the faucet has enough force to crush the lettuce green’s cell walls, causing bruising and browning. Instead, place the lettuce greens in a sink filled with cold water and agitate gently with your hands. Switch out the water when it becomes dirty and repeat until the salad greens are nice and clean.
Soak your greens for a couple of minutes in ice water, especially if they aren’t quite as crisp as you would like them to be or they’re showing signs of wilting due to age. Soaking them for a few minutes in ice water will replace any water-loss from their cell walls, bringing back their nice, crispy texture.
Use a salad spinner to dry greens. The centrifugal force of a salad spinner will make sure that salad greens are thoroughly dried. Patting dry with a towel is inefficient and could cause bruising. Also, salad greens that have too much excess moisture on the surface of their leaves will repel a vinaigrette, making it hard to actually dress the salad properly.
Store in a clean container, with damp paper towels. Wet some paper towels and then ring out the excess moisture until they are just slightly damp. Line the bottom of your storage container with damp paper towels, and then cover the top of the greens with more damp towels. Do not store in an airtight container or cover with plastic wrap. Salad greens need to breath.
In the SCS 15| Classic Salads & Creamy Dressings, we discussed three classical salads that are commonly found in U.S. restaurants. These salads are the Caesar, Louis and Cobb. Here is a quick break down on each salad’s components and their corresponding salad dressings.
Caesar Salad Components
Romaine Lettuce, usually just the hearts. The romaine can be chopped, but was traditionally left whole and eaten with the fingers instead of utensils.
Garlic Croutons: Don’t over think this one. Croutons are nothing more than toasted bread, in this case tossed with crushed garlic, olive oil and salt and pepper after being toasted. My favorite way to toast croutons is to fry them in oil, but you can also bake, pan fry or toast in a toaster oven.
Anchovy Fillets (Optional): Not a part of the traditional Caesar salad but is now a common component in modern versions. I like to personally use whole, white anchovy fillets called Boquerones.
Grated Parmesan Cheese: This can really be any hard, aged cheese that you desire. Parmigiano-Reggiano, aged Asiago, and Pecorino Romano are all good choices.
Caesar Salad Dressing Recipe and Technique
To better understand the process of making Caesar Dressing, first review this post on Understanding Emulsions. To make Caesar Dressing you will need:
2 Egg Yolks
6 Anchovy Fillets (Optional)
2 Cloves Raw Garlic
2 Lemons Juiced
2 Tbl Worcestershire Sauce
1 1/2 Cups Good Olive Oil
2-3 Ozs Grated Parmesan Cheese (Optional)
Water to Thin
Process
Combine egg yolks, anchovy fillets, garlic, lemon juice, and Worcestershire Sauce in a blender and blend until smooth (about 10-15 seconds).
Add in grated Parmesan Cheese and blend until incorporated.
Slowly start stream in olive oil to for an emulsion. If the dressing becomes too thick before all oil is emulsified, thin out with a little splash of cold water.
Continue to emulsify olive oil until it is all incorporated. The final consistency should be that of a thin mayonnaise.
Louis Salad Components
The components of a Louis Salad will change from chef to chef. Really what makes it a Louis Salad is the dressing and the addition of either cooked crab or shrimp. Here’s I like to use in my Louis Salads.
Cooked Crab Meat (dungeness is the best)
Cherry Tomatoes, halved
Iceberg or Romain Lettuce: It’s important to use a sturdy, crisp salad green that will stand up to the weight of the Louis dressing.
Louis Salad Dressing
Two Cups of Mayonnaise
1/2 Cup Chilli Sauce
1/2 Cup Heavy Cream
1 oz Minced Onion
1 oz Finely Minced Green Onion
1 oz Drained Pimento, Minced
1 oz Celery, Finely Minced
Combine all ingredients in a large mixing bowl and mix together until are ingredients are evenly incorporated.
Tip: To make sure the salad isn’t overpowered by the dressing, place all salad ingredients in an appropriate sized bowl, add a little bit of the Louis dressing, and gently toss with your hands. Add more dressing until desired flavor is reached, and then season with salt and fresh cracked black pepper.
Cobb Salad Components
Chopped Chicken or Slices of Turkey
Bacon, Cooked to Desired Doneness
Hard Boiled Eggs
Tomatoes
Avocado
Cheddar Cheese
Crumbled Bleu Cheese (Traditionally Roquefort)
Lettuce (Iceberg, Red Leaf or Butter Lettuce all work well)
Cobb Salad Dressing
1/4 Cup Red Wine Vinegar
1 tsp Worcestershire Sauce
1/2 tsp Dijon Mustard
1 Clove Garlic, minced
1/3 Cup Extra Virgin Olive Oil
Kosher Salt and Fresh Cracked Black Pepper to Taste
Combine all ingredients 1-4 in an appropriate sized mixing bowl and whisk together.
Continue to whisk while streaming in olive oil.
Once olive oil is combined, season with salt and pepper to taste
Assembling Your Cobb Salad
Toss your salad greens of choice with the vinaigrette above. Place dressed greens in a salad bowl, and arrange ingredients from the component section in straight lines, side by side, across the top of the salad greens.
Further Information
Since we covered so much ground in the French Mother Sauce Series, both on the blog and podcast, I figured it would be a good idea to place all the information in one, easy to find post. The mother of all mother sauce resources if you will.
So here it is; a list of the mother sauces with their corresponding podcast episodes, classic components, serving suggestions, and how to posts.
But first, a quick history lesson.
A Brief History of The Mother Sauces
The French mother sauces were originally four base sauces set forth by Antonin Careme in the 19th century. Careme’s four original mother sauces were Allemande, Bechamel, Veloute and Espagnole.
In the 20th century, Chef Auguste Escoffier demoted Allemande to a secondary sauce of Veloute, and added Sauce Tomat and Hollandaise.
One Last Thing…
Some of the classic versions of these sauces use different thickening agents to bring the sauce to its proper consistency. If you’re unfamiliar with thickening agents such as roux, liasons, or emulsions, you can follow the corresponding links for more information.
Sauce Bechamel
Base: Milk (Usually Whole Milk)
Thickening Agent: White Roux
Classical Flavorings: White Onion, Clove, Bay Leaf, Salt, White Pepper, Nutmeg
Common Secondary Sauces: Cream Sauce, Mornay, Cheddar Cheese Sauce, Mustard Sauce, Nantua
Classically Served With: Eggs, Fish, Steamed Poultry, Steamed Vegetables, Pastas, Veal
Technique and Recipe: How To Make Bechamel and its Derivatives
Corresponding Podcast Episode: SCS 11| Sauce Bechamel
Video Technique: Culinary School Bechamel | A How To Video
Sauce Veloute
Base: White Stock (Classically Veal, but Chicken and Fish Stock can also be used)
Thickening Agent: Classically a Roux, but sometimes also a Liason is used.
Classical Flavorings: None, used specifically as a base
Common Secondary Sauces: Sauce Vin Blanc (White Wine Sauce), Sauce Supreme, Sauce Allemande, Sauce Poulette, Sauce Bercy, Sauce Normandy
Classically Served With: Eggs, Fish, Steamed Poultry, Steamed Vegetables, Pastas, Veal
Technique and Recipe: How To Make Sauce Veloute and its Derivatives
Corresponding Podcast Episode: SCS 10| Sauce Veloute
Sauce Tomat (AKA Tomato Sauce)
Base: Tomatoes (Raw, Tomato Paste, Tomato Puree, Stewed Tomatoes)
Thickening Agent: Classically a Roux, modern versions commonly use a reduction or purees
Classical Flavorings: Salt Pork, Mirepoix, Garlic, White Veal Stock, Salt & Pepper, Sugar (Just enough to balance acidity, not enough to make the sweetness perceptible).
Common Secondary Sauces: Modern variations concentrate more on seasonings giving rise to sauces such as Creole, Portuguese and Spanish Sauce Tomat.
Classically Served With: Pasta, Fish, Vegetables (Especially Grilled), Polenta, Veal, Poultry (Especially Chicken), Breads and Dumplings such as Gnocchi.
Technique and Recipe: How to Make Tomato Sauce and Its Modern Variations
Corresponding Podcast Episode: SCS Episode 12| Sauce Tomat
Sauce Espagnole (AKA Sauce Brune or Brown Sauce)
Base: Roasted Veal Stock (Roasted Chicken Stock Is Sometimes Used In Modern Variations).
Thickening Agent: Brown Roux
Classical Flavorings: Mirepoix, Sachet (Bay Leaf, Fresh Thyme, Parsely), Tomato Puree
Common Secondary Sauces: Demi-Glace, Bordelaise, Sauce Robert, Lyonnaise, Sauce Madeira, Sauce Bercy, Sauce Chasseur
Classically Served With: Roasted meats, especially beef, duck, veal, lamb
Technique and Recipe: How To Make Sauce Espagnole and Demi-Glace
Corresponding Podcast Episode: SCS Episode 13| Sauce Espagnole
Hollandaise Sauce
Base: Egg Yolks and Butter (Classically Clarified Butter)
Thickening Agent: Emulsification
Classical Flavorings: Peppercorns (Black), White Wine Vinegar, Salt, Lemon Juice, Cayenne Pepper
Common Secondary Sauces: Bearnaise, Maltaise, Mousseline, Foyot, Choron…Also check out this post on How to Make Mayonnaise and Its Derivatives, which is based on the hollandaise technique.
Classically Served With: Eggs (Eggs Benedict), Vegetables (especially Asparagus), light poultry dishes, fish, Beef (Bernaise Sauce)
Technique and Recipe: How To Make Hollandaise: Guidlines and Techniques
Corresponding Podcast Episode: SCS Episode 9| Hollandaise

With Turkey Day quickly approaching, there has been a lot of talk on the web about whether or not you should brine your bird. Although there are good arguments from both camps, I think it is first important that the science of brining is understood before making any decisions.
A traditional brine is a water based liquid that contains between 3-6% salt by weight. Along with salt, a brine will contain aromatic herbs, spices and sometimes vegetables (usually mirepoix, garlic, etc).
So Why Would You Brine Meat?
Brining has two distinct effects on muscle tissue.
First, the high salinity of the brine “disrupts the structure of the muscle filaments” (On Food and Cooking, Pg 155). At about 3% salinity, the brine will partially dissolve “the protein structure” which supports the muscle filaments that contract when cooked. The more these muscles filaments are allowed to contract, the tougher your meat will be.
At about 5.5% salinity, the muscle filaments themselves are partially dissolved. Since their contracting ability is hindered by the salt, the muscle filaments contract less, effectively making your meat more tender.
Second, they way in which salt interacts with protein, allows the protein to retain more moisture, which is absorbed from the liquid of the brine itself. According to Harold McGee’s on Food and Cooking:
The meat’s weight increases by 10% or more. When cooked, the meat still loses around 20% of its weight in moisture, but this loss is counterbalanced by the brine absorbed, so the moisture loss is effectively cut in half. (PG 156)
This is what allows brined meat to stay more moist, compared to its unbrined counterpart.
The reason why a lot of people prefer to brine their turkey for the big day is because turkey breasts are finished cooking at around 145 degrees F, and start to dry out at around 155 F. The legs on the other hand need to be cooked to about 165 degrees F, because they have a much higher amount of connective tissue (in the form of collagen), and collagen doesn’t begin to break down until about 160 degrees F.
So by the time the turkey legs are done, the breasts are overcooked and dried out.
The problem with brining a turkey is the drippings contain much more water, and are too salty to make a proper pan gravy. Harrold McGee actually doesn’t brine his Thanksgiving Bird, and he explains why in his New York Times Article “Miracle Cure or Just Salt Water?”
Also, check out this Stella Forum Thread on Brining.
Sauce Epsagnole is one of the Five French Mother Sauces, and is the classical precursor to modern day sauces such as Demi-Glace. It goes great with any sort of roasted red meat, and is the base for many popular classic French Sauces including Sauce Robert and Sauce Bordelaise, (see below).
Before we get into how to make Sauce Espagnole, first, a little clarification about Demi-Glace.
Classical demi glace is one part Brown Sauce (Espagnole) and one part Brown Stock (Such as Roasted Veal Stock), combined in a pot and reduced by half. However, modern day menus that list a “Demi-Glace” as their sauce are usually referring to a stock that has been reduced by at least half, or until it coats the back of a spoon. The gelatin contained in the stock itself is what thickens the sauce. No other thickening agent such as roux is used.
Modern chefs prefer “full reduction” sauces over a classical demi-glace because they have a much more intense flavor, and the classical thickening agent of a roux makes the sauce heavy and effects its taste.
Recipe For Classical Sauce Espagnole (Brown Sauce)
Secondary Sauces (Derivatives) Made From Espagnole
Classical Demi-Glace
Sauce Bordelaise
To yield 1 qt/L combine in a sauce pan:
Reduce these ingredients by half, and then stir in 1 qt of demi-glace (see above) and simmer for about 15-20 minutes. Strain through a chinois and then finish by swirling in 2 oz of raw butter. Sauce Bordelaise was traditionally garnished with diced bone marrow that had been poached in salted water.
Sauce Robert
To yield 1 qt/L:
Further Information
Sauce Tomat, better known as tomato sauce, is a French Mother Sauce based on tomatoes. This base can consist of fresh tomatoes cooked down into a liquid, canned tomatoes, tomato puree or even tomato paste.
“Hey, wait a second now, how is tomato sauce a French Mother sauce when it’s clearly Italian?”
Well, you do know it was the Italians that taught the French to cook right? But that’s a whole other post. Suffice it to say that just like all the other mother sauces, “Sauce Tomat” is an incredibly versatile base sauce that can have any number of variations.
But before we start playing around with tomato sauce, it is important to first understand the classic version. My favorite classical recipe for Sauce Tomat is Escoffier’s version.
Escoffier’s Sauce Tomat Recipe
Although most of the sauce recipes that I’ve been giving for the Mother Sauces yield 1 quart (1 liter), this recipe will yield 2 quarts since you can almost never have enough tomato sauce, and it is always better the next day anyway. For Escoffier’s recipe you will need:
Modern Variations on Escoffier’s Sauce Tomat
The major difference between Escoffier’s version of sauce tomat and modern variations that are taught in culinary school are two fold. (1), The Roux is omitted and instead of using fresh tomatoes, canned tomatoes and tomato puree are used in the respective ratio of 2:1 and, (2) Instead of using white veal stock, modern recipes call for the simmering of a roasted ham bone.
Other than that, the process is pretty much the same as discussed above. Follow the same recipe and process, except use 3lbs of canned tomatoes and 2lbs of tomato puree instead of the 5lbs of fresh tomatoes. Simmer for two hours with the addition of a roasted ham bone and omit the veal stock since the tomato puree and canned tomatoes offer plenty liquid for simmering the sauce.
Another modern touch is the common use of aromatic fresh herbs including bay leaves, thyme, basil and oregano. Add these at your own discretion, at the end of the cooking process so that the flavor of the fresh herbs does not break down.
Basic Light Tomato Sauce
If you’re looking for a lighter version of tomato sauce to serve with a more delicate dish such as poached fish, use the ratios and procedure below.
Further Information
Roux – Equal parts flour to fat (clarified butter is traditional). There are three different stages for rouxs including white, blond and brown. Full thickening power is not realized until sauce or soup is brought up to a simmer after the roux is incorporated. For ratios and more detailed guidelines, check out this post on how to make and use a roux.
Liason – A mixture of heavy cream and eggs, added just at the end of the cooking process to slightly thicken, but mostly enrich, sauces and soups. The standard ratio for a liaison is 16:1:2. So for every 16 ounces (or one pint) of sauce, you will need 1 egg yolk and 2 ounces of cream. The liaison will be tempered with up to 1/3 of the warm sauce or soup before incorporated. This helps to keep the eggs from coagulating. For more information, check out this post on how to make and use a liaison.
White Wash – A mixture of water and flour is whisked together into a “slurry” before being incorporated into a sauce. The water helps to hydrate the starch molecules in the flour, preventing the flour from clumping when it hits the hot sauce or soup. This is an extremely poor technique to use. It is only listed here for sake of completeness.
Beurre Manie – Also known as “The Lazy Chef’s Roux,” Beurre Manie is equal parts of flour and whole butter kneaded together until it forms something like a dough. Pieces of this dough are then broken apart and added to simmering sauces or soups to thicken them. It is recommend that you simmer the sauce for at least 20 minutes more to cook out any raw, starchy flavor the flour introduces. Use the same ratios of Beurre Manie that you would a Roux.
Corn Starch – Has twice the thickening power of flour. Most commonly added to a soup or sauce in a slurry form, using a 1:1 mixture of water to Corn Starch. To thicken a sauce or soup with the consistency of water to a traditional nape stage (coats the back of a spoon), you will need 2 oz of Corn Starch for every 1 qt of sauce or soup. Full thickening power will not be realized until your sauce begins to simmer. Corn Starch has tendency to give sauces a smooth and shinny appearance. It is used extensively in Asian cooking, especially Chinese Cuisine.
Arrow Root- Very similar to Corn Starch with the same thickening power. It is used exactly in the same fashion as Corn Starch to thicken sauces and soups. Has a much more neutral taste than Corn Starch, but tends to be more expensive. Most commonly added as a slurry, and its full thickening power is not realized until the sauce is brought to a simmer.
Farine – Literally the French word for “flour”. As a thickening technique it refers to dusting your product (usually a protein) in flour. The excess flour is then shaken off, and the product is sautéd. The pan is then usually de-glazed, and a sauce is built on top of this base. Also commonly used to build a base for thick soups and stews.
Panade – Most commonly used to stabilize and bind meat balls and pâtés, it is usually a mixture of day old bread and some sort of liquid; stock, milk, water, etc. In the case of thickening sauces or soups, the bread is usually browned in butter and then simmered into the base that you wish to thicken. It can either be left as is, or blended and strained for a more refined consistency.
Food Grade Gums – Food grade gums are really emerging as the thickening agent of choice in a lot of high end kitchens. They’re gaining popularity because they are extremely neutral in flavor and are added in such low concentrations (usually les than 0.5% by weight), that they have no effect on color or flavor. One of the most commonly used food grade gums for this purpose is Xanthan Gum, which can be picked up at a lot of health foods stores.
UPDATE: You can find our instructional video on how to make mayonnaise here.
Like many of the mother sauces, a well made mayonnaise is the base to an endless possibility of cold, emulsified sauces. Although now days there are many good quality commercial mayonnaise available, understanding how to make a mayonnaise is basic knowledge that every cook or chef should have. Not to mention, that with the selection and use of high quality products, fresh made mayonnaise can have a far superior flavor to that of its commercial counterparts.
Some Guidelines for Making Mayonnaise
Use a blender, food processor or a stand-top mixer with a whisk attachment. Not only will it ensure that your arm doesn’t fall off from hand whisking, but the shearing power of these devices is capable of breaking the oil into much smaller droplets, making a more stable emulsion.
Have both your egg yolks and oil at room temperature before starting. It will make the emulsification process much easier.
Use the freshest eggs possible, preferably organic from a farmer’s market. If cooking for children or the elderly, pasteurized egg yolks are always recommended.
Standard Ratio for Mayonnaise
At it’s most basic level, mayonnaise is simply a neutral oil emulsified into egg yolks. The ratio for a basic mayonnaise is:
1 yolk per 1 cup of neutral oil (canola, safflower, grape seed).
Although many classical recipes call for the addition of other ingredients, egg yolks and oil are all you need to make a mayonnaise. Some additional ingredients that are used to season mayonnaise are:
Vinegar
Salt
Pepper (usually white)
Dry Mustard
Cayenne Pepper
Lemon Juice
Standard Recipe For 2 Cups of Mayonnaise
2 egg yolks
1/2 table spoon of vinegar
1/2 teaspoon salt
1/2 teaspoon dry mustard
Small Pinch cayenne
2 cups Salad Oil (canola preferred)
1 Tablespoon Vinegar
1-2 Tablespoons Lemon Juice
Put ingredients 1-5 into a blender, food processor or KitchenAid with a whisk attachment and mix well.
Very slowly at first, start streaming in your oil, a little at a time until your emulsification starts to form.
Use the 1 tablespoon of vinegar to thin the mayonnaise if it starts to become too thick before the emulsification is complete.
Once all the oil is incorporated into egg yolks and the mayonnaise is finished, it should be thick enough to be turned upside down without the mayonnaise coming out of the mixing container.
Adjust the final seasoning with the lemon juice, salt and pepper (white, cayenne or black pepper depending on preference).
What’s The Difference Between Mayonnaise and Aioli
A common question asked is what’s the difference between mayonnaise and aioli. Now days, the term aioli has been bastardized by some chefs to be synonymous with any flavored mayonnaise. However, there is an exacting classical distinction between mayonnaise and aioli.
The difference between mayonnaise and aioli is the simple fact that aioli is made with extra virgin olive oil and has the addition of crushed garlic. So to make aioli, follow the standard recipe above, but instead, substitute the canola oil for extra virgin olive oil and add 1 tablespoon of fresh minced garlic to the egg yolks during the blending/beating process.
The simplified ratio for Aioli is:
1 egg yolk + 1 cup extra virgin olive oil + 1 teaspoon of crushed garlic = Aioli.
This ratio can be seasoned with lemon juice, salt and pepper to yield a simple and traditional Aioli.
Mayonnaise Based Sauces
As stated before, mayonnaise is a great base to use for making other unique sauces. One of my all time favorite cook books “Charcuterie” by Michael Rhulman and Brian Polcyn, makes these suggestions:
For Pork try adding some cumin, cayenne and lime juice.
For Fish add saffron and garlic.
For Chicken add lemon juice and tarragon.
For Beef add a little fresh horse radish (I would also recommend some fresh chopped chives).
Another very traditional mayonnaise based sauce is Remoulade which is traditionally served with fish. To make a traditional remoulade you will need:
2 Cups of Mayonnaise
About 1 tablespoon of good Dijon
1/4 cup finely chopped cornichons (Tiny, French, Sweet Pickles)
Tablespoon chopped capers
1 anchovy fillet, finely chopped
3 tablespoons chopped parsey
1 teaspoon chopped fresh chervil
1 teaspoon chopped fresh tarragon
Mix all ingredients together and serve with fish. This is a great dipping sauce for fish and chips!
To make other mayonnaise based sauces, start with 2 cups of freshly made or neutral store bought mayonnaise and add:
Thousand Island Dressing: 1/2 cup chili sauce, 1/2 ounce minced onion, 1 ounce finely chopped green pepper, 1 ounce drained pimiento.
Louis Dressing: same as Thousand Island with the addition of 1/2 cup heavy cream.
Russian Dressing: 1/2 cup chili sauce or catsup, 1 ounce fresh horseradish, 1.2 ounce minced onion.
Chantilly: 1/2 cup of heavy creamed whipped until a stiff peak and added in just before service.
Blue Cheese Dressing: substitute one cup of mayonnaise for one cup of sour cream (optional but really good), add 1 ounce white vinegar, /2 teaspoon Worcestershire sauce, 4 ounces crumbled bleu cheese; thin with 1-2 cups heavy cream, half and half or buttermilk.
Ranch Dressing: 1 1/2 cups sour cream, 1/2 cup buttermilk, 2 ounces wine vinegar of your choice, 1/2 ounce lemon juice, 1/2 ounce Worcestershire sauce, 2 Tablespoons chopped parsley, 1 tablespoon chopped chives, 1-2 crushed garlic cloves, 1 scallion (green onion) finely chopped, 2 teaspoons celery seed.